My Modern Briefcase PC Project
So in the 80's and early early 90's, doing your computing on the go wasn't as easy and convenient as we are graced with today. There weren't really laptops as we know them, what was around was either really really REALLY fat, or basically just a computer stuffed in a briefcase. You were lucky if your "portable PC" was under 20 pounds.
In my usually thrift shopping and computer trading escapades, I had received from a friend a couple of "LCD-286" labeled briefcase computers, one non functioning, and the other completely empty, lacking a screen and keyboard.
They look something like this crisp and brand new. There are a few other different variations of this portable out there, but this is the one that looks the most like mine

So looking over this empty case(s), it appeared to be a somewhat modified version of a baby AT case, just very very small and lots of the ports are relocated. Being that it looked not too different from your typical modern ATX layout, I figured it would be a fun little project to make a modern version of what this machine would have been.
I gathered what parts I had to try to make this thing, so what I had at the time was:
- - -
A small pre-built dell motherboard (my old server board) with a 4th gen i3 in it. This was the only modern board I could get to fit
16 GB of ram for that board
a small gtx 650 gpu
a few psu I had about, I tried a few different ones
- - -
This certainly isn't going to be a top tier PC, but you could still do a lot with it. It's also going to have a built in display just like the original, as well as use the original keyboard which has cherry switches and a nice dulch color scheme. It's very nice to type on, and connects via an AT port, so shouldn't be to hard to adapt. If I can manage, id also like to have a battery powered RasPI inside that you can switch to and use as well, space permitting.
Heres what the briefcase looked like before I did anything to it. Excuse my messy room.


It just kinda looks like an upside down ATX case, right?
Unfortunately none of the standoffs in the case matched up with that though, so I had to drill into the metal part of the case and add standoffs to accommodate. This wasn't too hard.
...and it looks like this

If you look closely you can see theres actually no standoffs in that picture, and thats cause I took it when I was just testing the fit, but it pretty much looks just like that, with the GPU lining up and all. You can also see the original board in the top right. It has a totally busted cap on it and all over, its gorked.
Unfortunately due to the layout of the case most of the IO is unaccessible, as you can see below. You can get to the Audio jack, GPU and a USB, maybe another USB and Ethernet.
I suppose I should also mention that though I beleive the display works, I cannot use it. It has some kind of strange custom ribbon cable pin-out that was to my knowledge, only working with the card that came with it. With some more digging. I believe I found that the display uses a CGA signal, so even if I figured out the weird pin out I would have a really hard time getting a modern PC to connect to a CGA display, so I'm just going to put a more modern 9 inch display in the old ones enclosure, and save the old screen for a rainy day. A modern display would be a lot nicer anyway.
I figure though because its going to have an integrated screen and keyboard, how much IO do I really need? So I'm planning on filling the boards remaining pcie x1 slot with a usb controller card and make some custom cutouts and routed ports for the rest of the important stuff.

Everything was going smoothly so far, but putting the PSU in was a bit of a pain in the ass. I thought it was just going to fit in where the 5.25 floppy drives would have been, but its just a little bit smaller than that.
I ended up making mounting holes in the case and using some bracket and fan cover laying around to bridge the gap hole. It ended up being pretty sturdy, and I can just swap in another standard sized PSU if need be. I also made a mount at the bottom of the case for a laptop sized hardrive.


Everything is very sturdy placed and I can pick the case up and twist it all directions up down and about and everything stays right where it is. It could definitely be lugged around no problem, despite how jank it might initially seem.
Also, since all the holes and standoffs are properly measured out, I could eventually upgrade a few parts if need be, say like a bigger better GPU.
(if they every get less expensive for christ sake, fuck crypto currency)

SO everything is in there quite nicely with some room to spare. It would be a lot cleaner with a modular PSU, but whatever.


And it boots up and works great!! It currently has an old install of Windows 7 on it, but I plan on putting a Linux distro with some sort of tiling window manager on there as well.
When playing a game on it, the thermals held out really well which is surprising. I was expecting it to run a little hot cause there isnt much of and airflow through it yet (I need to add a fan), but everything sits at between 30 and 40 C while gaming, perfectly fine.
The Next steps for this build are going to be installing the internal screen, usb card, and working out all the rest of the internal wiring, but I cant afford it atm, so this project will have to be a to be continued.
Stay Tuned!
... week later update
So, I put the project on hold for a bit because I was broke, and I was kinda waiting to buy a screen.
That was until my roommate found this at a goodwill outlet.


... Continued update
It's like a completely transparent little TV?.. Apparently in order to have a television in prison, it needs to be completely see through to stop stuff like smuggling or hiding contraband. I had seen one once before but it was a little tiny CRT, this is the first time ive seen an LCD.
Unfortunately it is in pretty bad shape, and its not like terribly rare to find one around or online, so I thought that it might be a good thing to part out for the display, driver board and speakers. The screen was about the right size, and was in good shape, and the display itself had lots of different input I might be able to take advantage of.

So I installed standoffs in the inside to mount the driver board, and did a test fit to the screen. it looked like it would fit, but it was a bit larger, so the screen would loose its tilt controls as it would just lay over the cavity. It also had to be mounted upside down so the cables could reach on the inside, which kinda sucks, but I can always flip the screen in hardware.
I thought this would be fine but after trying to mount the display, I found it very difficult to stay. I also found that the keys press down on the inside when the Key cover is placed on, due to the added depth of the screen sitting on top of the cavity. Not good.
This was a photo I took a little later to show how the screen went in roughly, using this display

So, I decided it was probably a better idea to order a display that would actually fit instead. So I ordered a little 10" display in the hopes that I could mount it in the old display's case.
I received the display and mounted the new much smaller driver board inside of the case. Unfortunately this display also needed to be mounted upside down for the cables to reach.


The plan was to place this small newer display inside of the case and bezel of the old display.
I attached rubber feet to the screen's metal bezel to keep the the display from moving, then secured in place with flattened PCI covers, with a small piece of cardboard as cushion.


I mounted the new much smaller display driver board inside the case and routed the needed cables inside the remade grommet holes. Unfortunately, in order for the cables to actually reach I had to mount this display upside down too, which is a huge bummer. Luckily I can just flip the screen in software so its really just a minor inconvenience.


So I was ready to put the thing together for its first full pilot run, and god its a total mess. I really wish I had a modular power supply for this thing, but that cant be helped right now.
On top of that there is also the entire power brick and the fat test cable for the monitor that I have cluttering up the space inside. This unfortunately means for now I have to plug in two different cables for power, and have this huge annoying DVI cable sticking out the side. I intend to solve this issues very soon once some mail comes in.
Despite all the cable clutter I was able to close it up and give everything a test run.


... and holy shit it works great. I was able to play some quake 3 arena and the display and everything worked perfectly.
So now that the basic thing was built, I needed to improve some of the things about it, so to the land of online commerce I went, seeking parts.

These are the things I picked up:
- A USB header splitter board
- USB header directly to USB
- 2 USB headers to your typical PCI cover
- USB to PS2 Adapter
- A HDMI to angled mini HDMI ribbon cable
To extend and take advantage of one of the only non proprietary ports on this Dell Mobo.
For any kinda internal USB i might need, like bluetooth dongles or the internal USB to PS2 port adapter.
To have more accessible USB ports to the outside of a case
I'm going to use this and a AT to PS2 adapter I already have a for an AT port for the Briefcase PC's included Keyboard, just like how the original version had.
This funky cable is going to make it possible to very covertly use the GPU's mini HDMI port for the internal display
I got all of these things in the mail, and it cut down on the amount of wires and shit inside of the case quite a bit. You can also see how the HDMI cable really covertly goes the PCI covers. I'm sure with some zip-ties and more time I can make all the cables quite managed. I ended buying a different adapter for the internal keyboard, because the specific on picture here doesn't seem to like this computers specific Keyboard. No biggie though, could always use an extra ps2 to usb adapter.


I also created this little cable out of an old molex fan thing. It outputs 12v from the molex connector to a barrel jack, so now the display and driver board are all powered from the internal PSU. It works wonderfully.

I had also devised a ways to mount the internal display in a way that look really nice, as opposed to the way it currently is. Unfortunately in implementing it I some how messed up my display and its no longer turning on. So I had to order another display, and while I was at it I ordered a longer LVDS cable so the display no longer has to be mounted upside down. SO this is briefly to be continued.
FINAL UPDATE!!!
I have finally completed this project, so let me show you what I did to wrap it up.
Fortunately I was able to get a new display and driver board for this computer, but it wasn't the one I initially ordered. I initially ordered the exact same display that I had in the first place, and a slightly different display driver, that had more inputs (I had planned to have this computer be able to accept external inputs for its display, just for funzies). Unfortunately though, the person I was ordering the display from wasn't able to send it out in time, and ebay eventually had to refund it. It's no fault of theirs though, they apparently had a really major surgery and were really out of it because they were recovering, hence the long delay. Thats fine and all, but they were the only place on ebay that was selling 10.1 inch displays at that high of a resolution. So I had to settle with a a much smaller resolution display, 1024x600 from 1366x768. I suppose that its not that bad considering it's a smaller display.
Pictured below are the new driver board and display. The better way to mount the display, as I had mentioned before, involves some really dark construction paper, and plexi glass and the of course the old displays housing. I cut the papers to fit over the silver boarders of the display as well as the dead space inside of the computers original display, since a modern 16x9 display isnt quite the same as whatever this had inside before. The old display was something more like 16x10 or 16x11. On top of that I place the plexi glass display to give the display a little more rigidity, and to fill that extra space, and then I mount the whole thing inside the old displays enclosure just as before.


And Yeah, it looks great. Now that I look at this particular picture it is a tad bit crooked, but you will see in later photos that I fixed that, but Im pretty happy about it. I forgot to mention but I bought a new LVDS cable that is much longer so this dispaly doesnt need to be mounted upside down anymore! yay! However this new display did present some new issues.
So when I ordered this new driver board, the seller asked me to send details about the display it will be driving. This is bad because I had sent the display that never came, for them to configure the board for. So this lead to a miss match where the display was just expecting its native resolution, 1024x600, and the driver board could only do variants of 1366x768. So the image was cropped. I tried to force the resolution in software, tried a different OS / versions of arch, played around with different GPU drivers in linux, and even contacted the person who sold me the driver board to see if I could reconfigure it myself, but I had no luck.

I eventually did fix it, but god was it a hacky solution. In nVidia's driver panel on their proprietary drivers, I was able to set the X servers view in port to what the driver board thinks the display is (1366x768), and X's view Out port to what the display actually is (1024x600), essentially downscaling the display. You would think that this would cause the display to look bad but everything looks great actually. I was surprised. I just had to turn the font size up a little but everything looks good, and at resolution that is basically 1366x768, the display I had initially.
You will probably not that in the settings it show s a panning resolution of one pixel larger than the view in. I had to do this because if I had set it to the same as viewport in for some reason it would just default back to what I had in the first place, with everything cropped. Im not really sure why that is but its ultimately not a big tradeoff, the screen just jitters a bit if you push too much against the top or bottom of the screen with your mouse, and even then its not really noticeable.
I feel that its a pretty reasonable tradeoff, cause the only other functional configuration that I found with this hardware is a 1024 x 600 window that pans around a 1366x768 desktop, that or but another 80 dollar display and driver board ; - ;
Once I finished that I installed Manjaro on the Briefcase, and then installed i3 with my personal config for it and all the rice. I went with manjaro this time around instead of plain arch because I really REALLY didn't want to deal with installing arch and reinstalling the nVidia drivers in a TTYL with a goofed up cropped screen. Plus Manjaro came with bluetooth drivers and wireless drivers pre set up and everything, so that was nice.
Did I mention I put bluetooth adapter in this thing? Check out where.

I took advantage of one of the covered usb ports on the motherboard lol, cause what else would I do with it. No I did not take the mobo out to put it in, I spent longer than I would like to admit, with a set of needle nose and very carefully plugged it in.
Ive also installed a fan, and properly mounted the AT to USB passive adapter where it needs to be. The fan conveniently connects to the molex to fan header adapter that I used to make the power adapter for the driver board.

Anouther thing that I had to impliment was to give this thing it's own internal speakers. Up untill this point it hadn't any sound. So I went out to a flee market to find a cheap pair of pc speakers that I could gut, luckily these ones are USB powered..
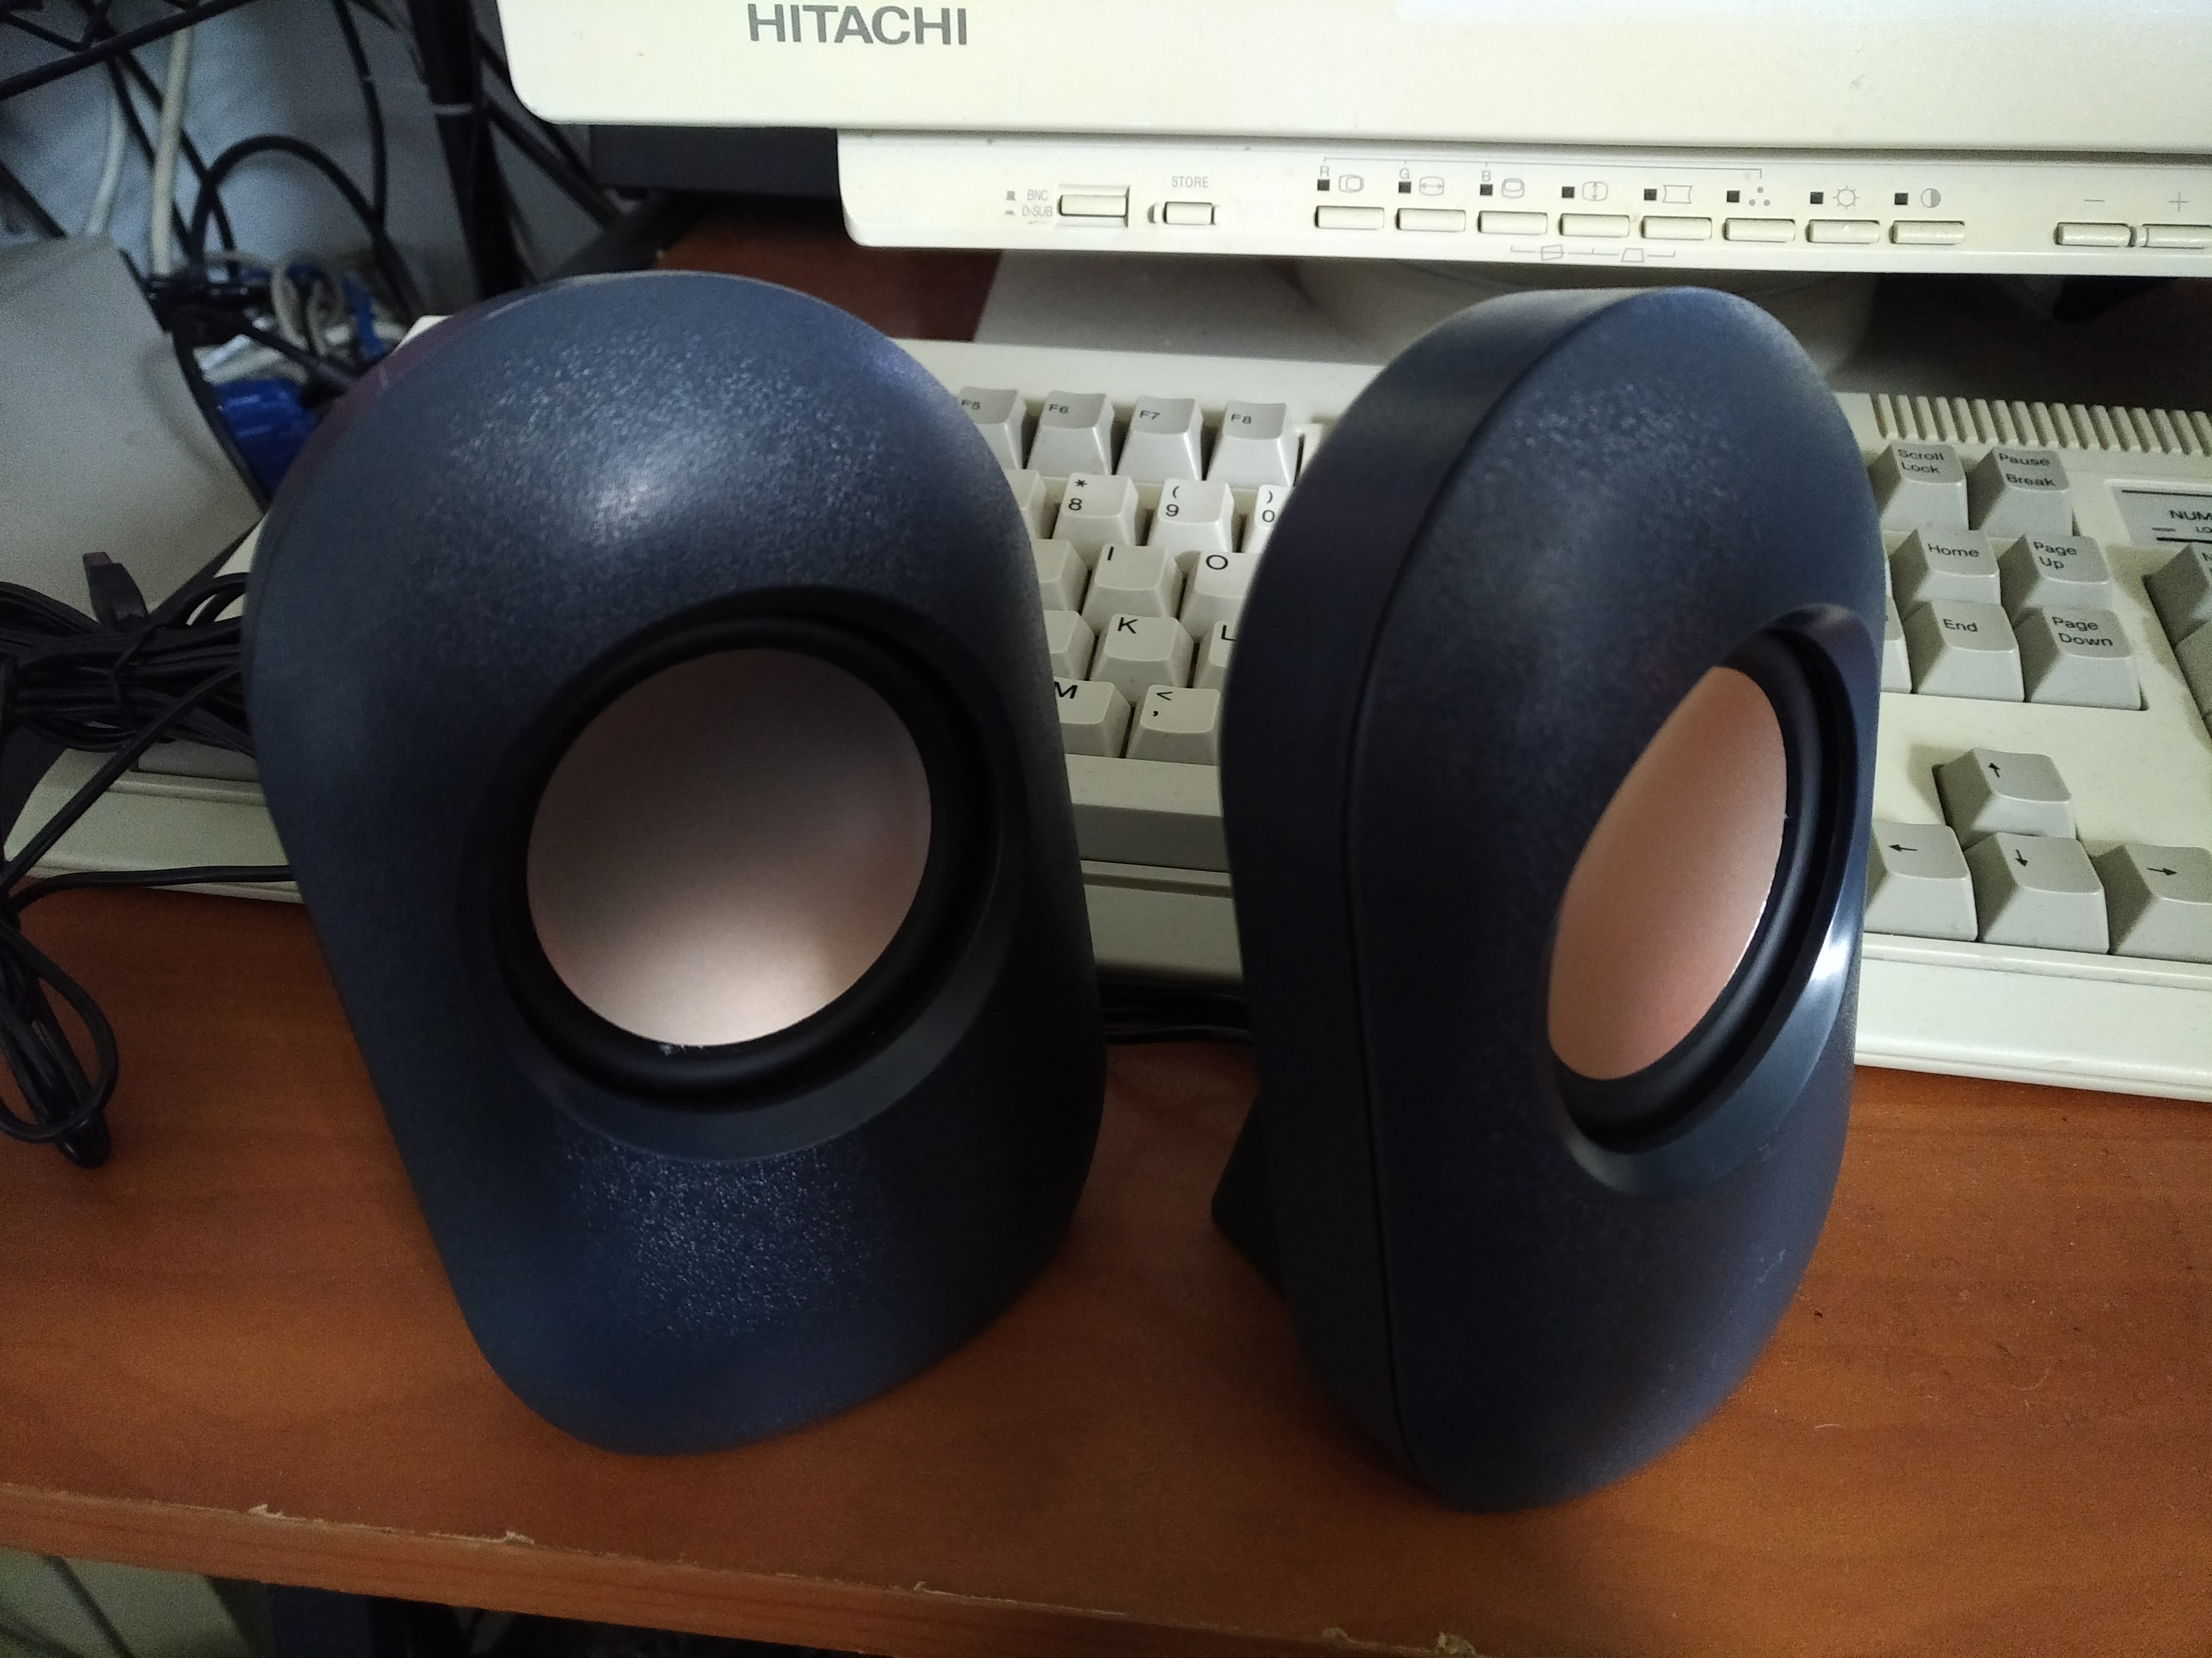
I trimmed down the speakers to just the physical speaker, and the volume slider. I got rid of the left speaker because there wasnt really room for it. Mono was going to be fine for this use case. I mounted the speaker inside where the PC speaker initially was.


Unfortunately it seems like my internal USB headers were not able to power this speaker through it's USB cable, so I cut it off and made a molex adapter it just like I did for the driver board, except this time I used the 5v lines instead of the 12v ones. This works great, and there isnt any interference.
I was wanting to connect the headphone jack internally to the driver board, because I thought it had some kinda audio output for it's HDMI input, but I think it's actually an input for the VGA, so I had to use the mother boards audio jack. It's not as elegant as Id like, but hey if you want to plug in your headphones you just unplug it, and then plug them in. I also ordered an angle connector so it would lay flat against the case. Now the cover can go on given the antennas are not screwed in. Maybe I work out a better more covert way to for the wifi antennas to stay attached


So at this point this is what it looks like internally (bar the adapter I just mentioned, and a couple things moved), and will pretty much stay this way. It's kinda chaotic, but everything has it's place and it works well. Surprising it gets good temperatures. In playing a game It hangs around 32 C which is much better than I had thought it would be.

I had another issue that I had to solve, that was kind of a big deal. Because this is a Dell motherboard, it has these stupid warnings that come up when it boots, because Im not using the hardware that it expects. The menu is not really a big issue because you can get past it by pressing F1 and everything works as normal. The problem is the keyboard adapter I have doesnt work in the BIOS for some stupid reason, so ive been having to plug in a different keyboard to get past it, which really hurts portability.

I couldnt use the ports that it's complaining about because they are proprietary, and I wasnt able to tell the bios to ignore this stuff because it lacked the option. So I decided to go for a much stupider solution.

So.. I have a couple of these USB pedals that you can program to any button on the keyboard. I programmed this one to F1 and it does in fact work in the BIOS. So I trimmed it down to just the button, mounted it in a convenient place and connected the USB to the internal USB headers. And there you have it, a dedicated BIOS skip button.


And thats about it really. THere are a few things that I would do differently if I could, but I was only using what I had around. If I had bit more of a budget I could likely make one of these really beefy, because you could fit a much larger GPU inside, a better mobo processor etc. I certainly could have had a better time with the display and the driver. I have another briefcase pc that is the exact same model, except its missing a keyboard, maybe at some point I could do another one. At least this next time around I would know exactly how to go about it.
I decided to go with the host-name "NOMAD" for this machine, because I felt it was fitting. It is portable but to use it you need to sit down and plug it in to use it.
Here is a little demonstration video showing it in action. I feel that just photos don't necessarily show everything, especially it in operation. Thanks for tuning in!

UPDATE, again..
I've been putting this off for a while, but at the beginning of this year (2023) I had made a few improvements and upgrades to the briefcase PC, so I'll tell you all about that now!

So one of the first things that I did was get back in contact with that person who sold me the LVDS that I borked, and ordered anouther one once I was able to afford it, and this time very very carefully installed it. I came up with a slightly different method to secure the display, that isn't to different to how I did it before, just with more hardware keeping it all in place.
So now I don't have to have to flip or scale anything in the OS to make the display work right, and now I have the full real 1366x768.
The Hardrive in this thing was fucking terrible. It was some old af 5400 rpm toshiba drive I had laying around, and even with linux on it disk operations just CRAWLED making the computer unusable. So I took the SSD out of my laptop I wasn't really using and put it in there.
One of the biggest things that I did was put a new GPU into this thing, which required a lot or rearranging of parts and better cable management, you can see me doing this in the picture above. The GTX 1060 is a lot more powerful than the 650, but also much larger. I have 2 1060's and I decided to go with the once that had the blower fan because it was smaller, but it still took some careful arrangement. Another small annoyance that I hadn't really thought about was that this particular gpu didn't have a micro HDMI port like the 650 did, so I had to order another flat cable.
What else did I do? I got a different wifi card, but I can't really remember if I mentioned that before. This one is is just newer and a bit more reliable. THe antennas are slightly longer.
Unfortunately a downgrade I made in the process of doing all these upgrades was I ended up breaking the brittle cabling on the internal speaker. I soldered it back but apparently not well enough because there was all kinds of interference getting into the sound afterwards, so I ultimately just took it out. Maybe at some point I will put another one in there, with a better implementation.

The computer still runs fairly cool even with this comparatively power hungry card, but its a lot louder which is something i'm not particularly found of in this situation. There is room up there above the card for airflow, but the photo doesn't really show it that well.
It games pretty well, the bottle neck is the CPU now, which at some point I may upgrade as well. It's a Haswell socket, so I could potentially put an i7-4790K in it, and it would basically be the same as my Daily driver linux machine (which has a i7-4790K and a 1060 in it), which is just mind boggling to me
I currently have this thing set up to do portable DAW music stuff on, and im contemplating buying a Focusrite Scarlett 2i2 to take a part and integrate into the left open port and case openings to aid this use-case, maybe Ill put a MIDI controller in there as well. The GPU is a bit loud for this, so maybe ill go back to the 650 / hotswap cards / get a different card for this scenario, time will tell.

Until next time friends, take it easy
Even More updates!
Hello Again, I have further updated this project to suit my needs. This computer has pretty much became my dedicated DAW machine, and for this it works wonderfully, but I did have to make a few changes to further suit that use case.
Here are some pictures of the setup:


The tiny screen isn't really practical to have the ENTIRE DAW on but it is nice to have maybe 1 or 2 plug-in interfaces that I actively change while playing. I usually have it linked up to my main monitor as well.
In using this machine for music production I ran into a few problems, it was really fucking loud with that fan in there on full blast, and the split up USB hubs were not handling the audio interface + mouse + MIDI devices all at once. So to remedy this I ordered a decent PCIe USB controller card (it has a separate USB controller per port, this is important for the amount of data throughput I need), as well as this little fan controller for the fan on the inside.
Unfortunately, because this computer only has 1 PCIe slot, I had to replace the wifi card with a USB3 one, which it works great it just doesn't look as cool as the the antennas ; - ;


Now with it all installed you can see the new IO, additional USBs and that little nob to control the speed of the internal fan when needed.
Now I had been using it like this for some time, and it works wonderfully, but it also occurred to me that this thing even though portable, would not always be practical to take with me to do music stuff out and about.
It would also not be very practical to have to maintain all my drum samples, project files and recordings amongst several machines. So how do I get around this?, well I devised a somewhat unorthodox, but practical solution.


Quite a long while ago I had bought this Hardrive hotswap 5.25 bay for my computer, it was pretty neat and has these little mechanisms that pop your drive out for you, but within like the first 3 months of me having it something with the IC on the top laptop form factor drive bay had broken and it wouldn't connect anymore. The bottom bay worked fine though, and from the looks of it was just a straight sata connection with no circuit in between.
So I kinda just used this thing as an extra harddrive slot in my computer, which wasn't really wise because it was just begging to be popped out at anytime and fuck up a file transfer on it.
When thinking about this limitation with my briefcase PC, I considered that maybe I could use this broken hotswap bay to make the hardrive on this machine easily swappable. This broken bay did look as if it could be taken apart fairly easily.


And it turns out, that yes it could! WIth just a couple screws the top bay separated from the bottom and all the eject mechanisms work just fine.
The part I was most worried about was getting the SATA ports to line up properly, because as I said earlier the top bay had died, but it turns out this didn't end up being an issue either because the bottom bay's passive SATA pass though connector fit exactly in the same place that the top's did.
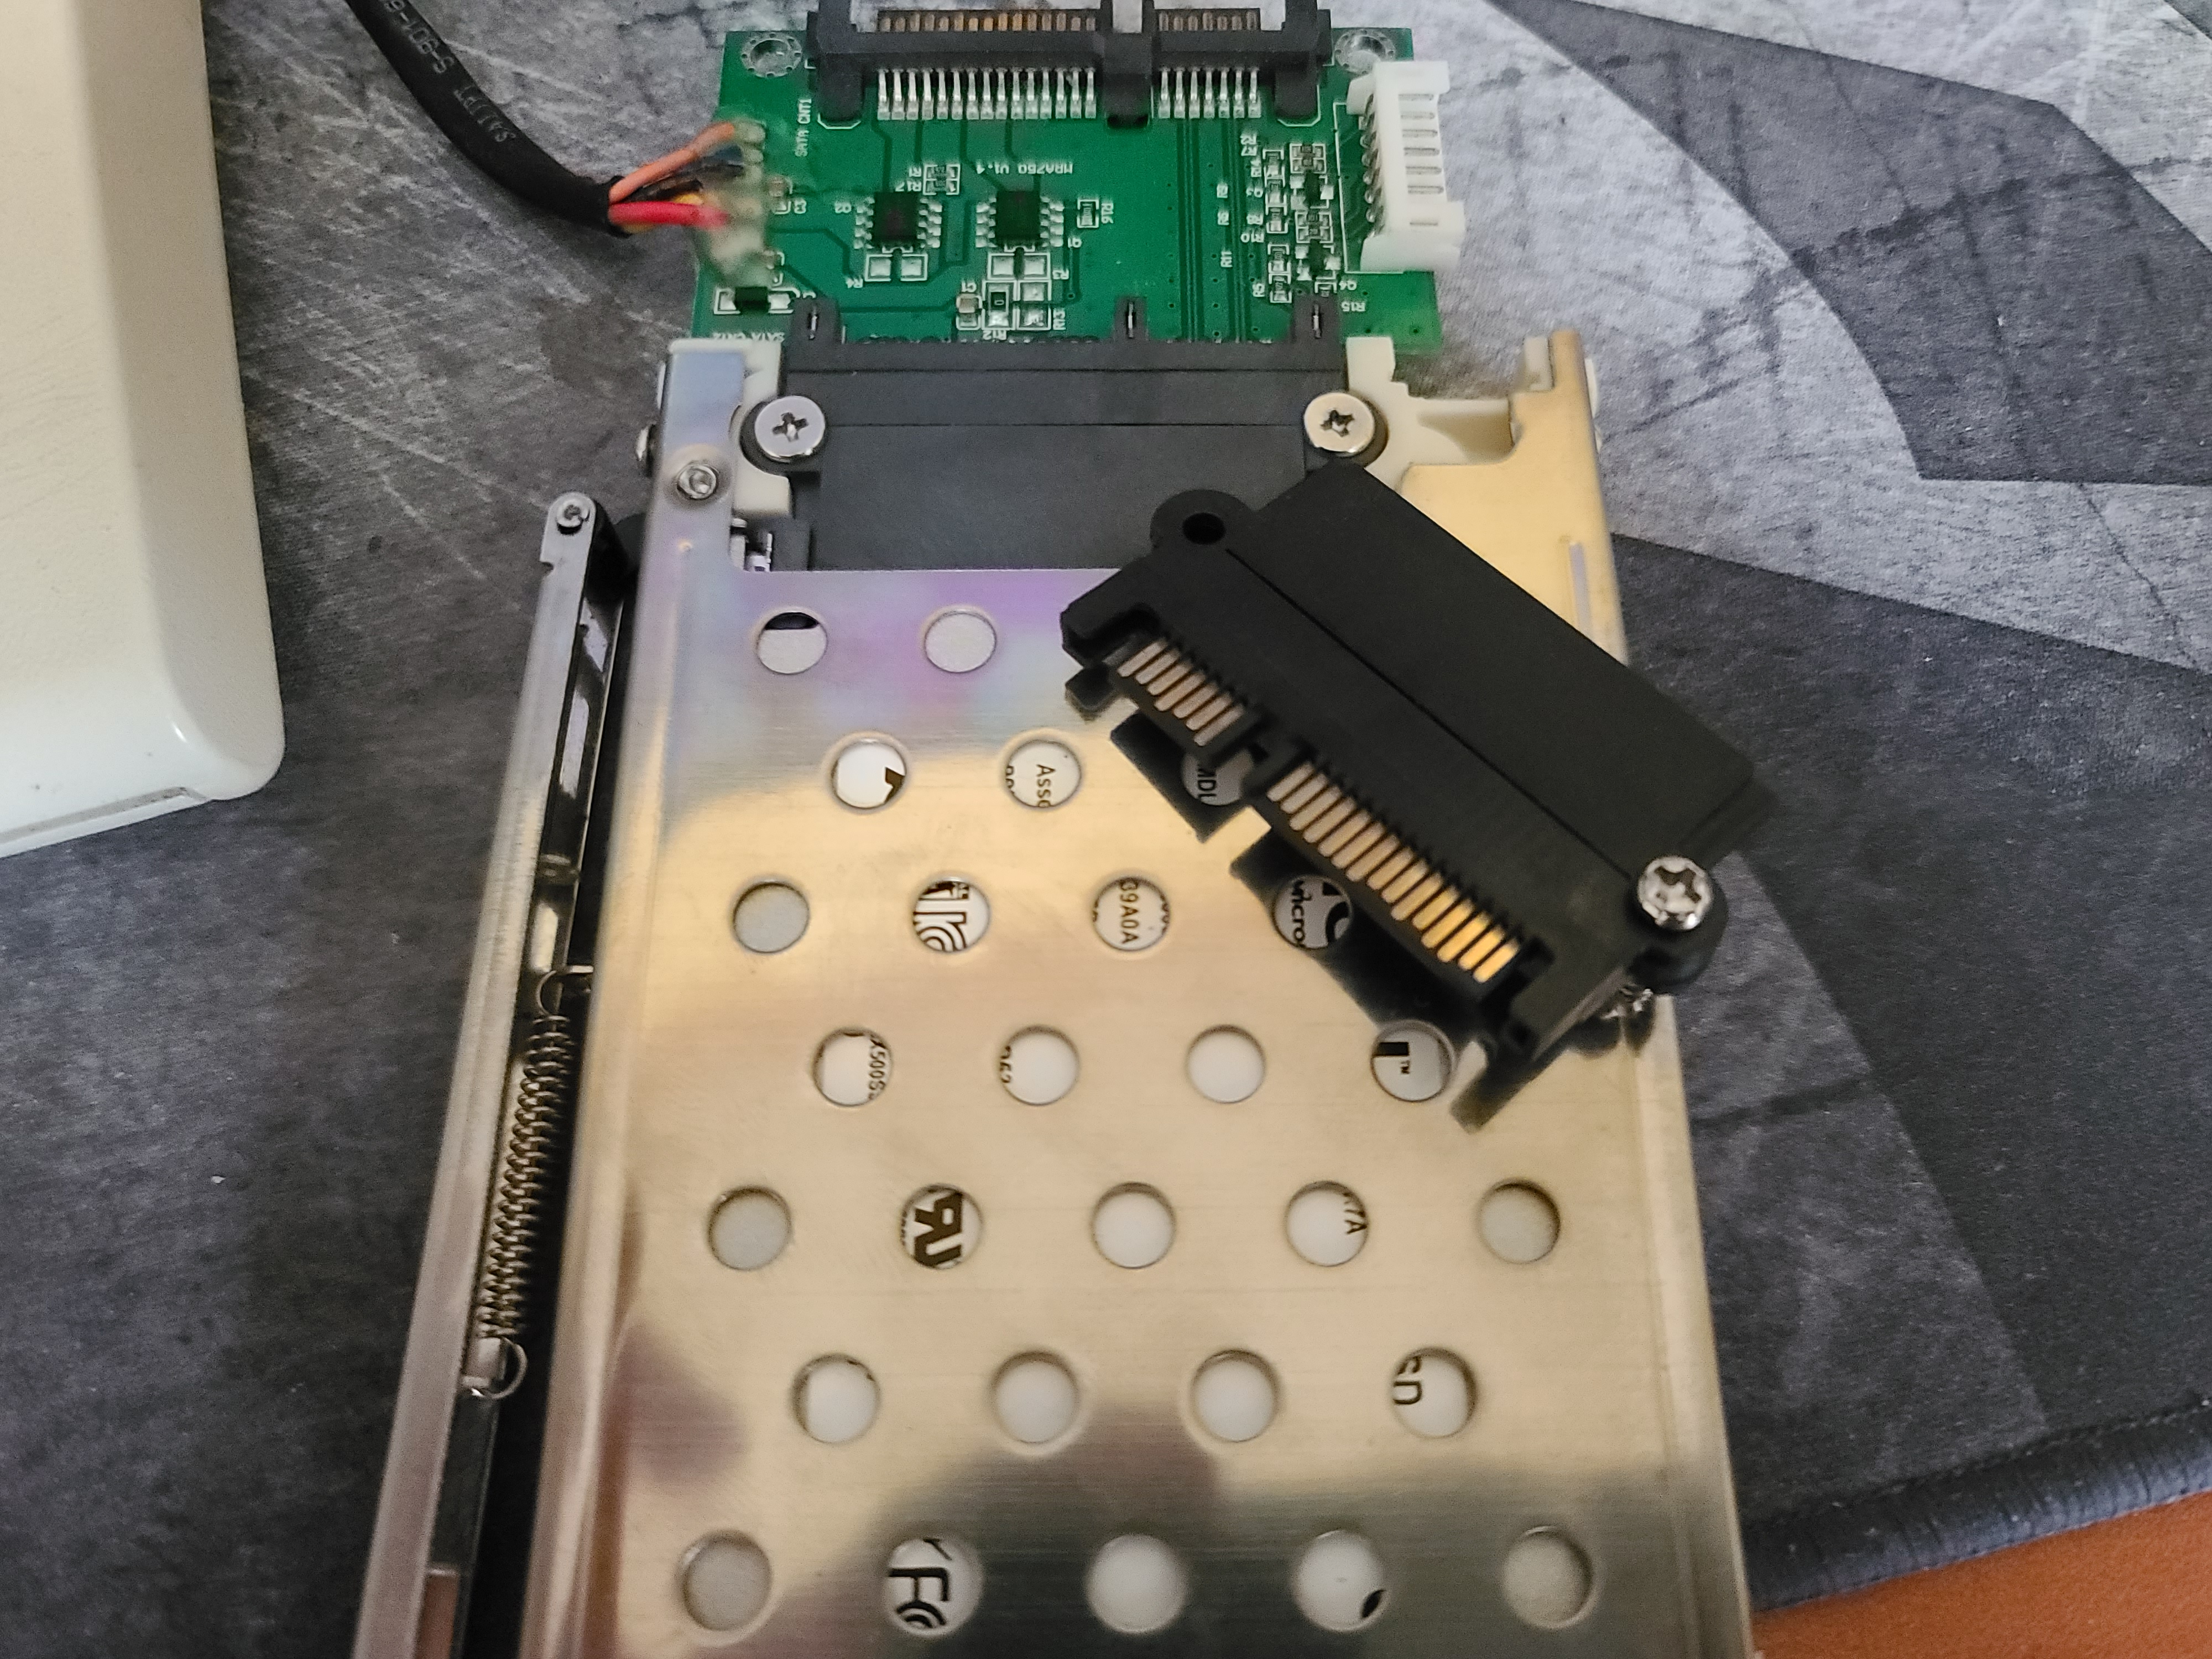
I'm not going to lie, I was pretty baffled how smoothly this was going. Arguably the hardest part was just redoing the wire management after putting the Hotswap Bay in. Look at how perfectly this SATA cable connects up though.

And here is the end result, the Hotswap bay fills a bunch of dead space on the side where the PSU is, so it's quite nice.


Here is a video Demo of how easy it is to take the drive out and slap it in my CD Drive Caddy for my Thinkpad!

So now with this extended functionally I don't have to worry about copying over samples or projects, I can use either machine whenever, and if I want to have a Linux distro on the Breifcase PC, I can just pop a different drive inside. Very Flexible!
I suppose that this is the beauty of making your own things, is the flexibility to suit to your own use-cases!
Thank you for reading, until next time friends!